
7-Pin Trailer Connection Diagram & Wiring Guide
If you need to wire or replace a 7-pin trailer connector — or adapt a 4-pin trailer to a 7-pin vehicle — this guide has you covered. You'll find pin-by-pin diagrams, brake and battery wiring steps, and a complete 4-to-7...
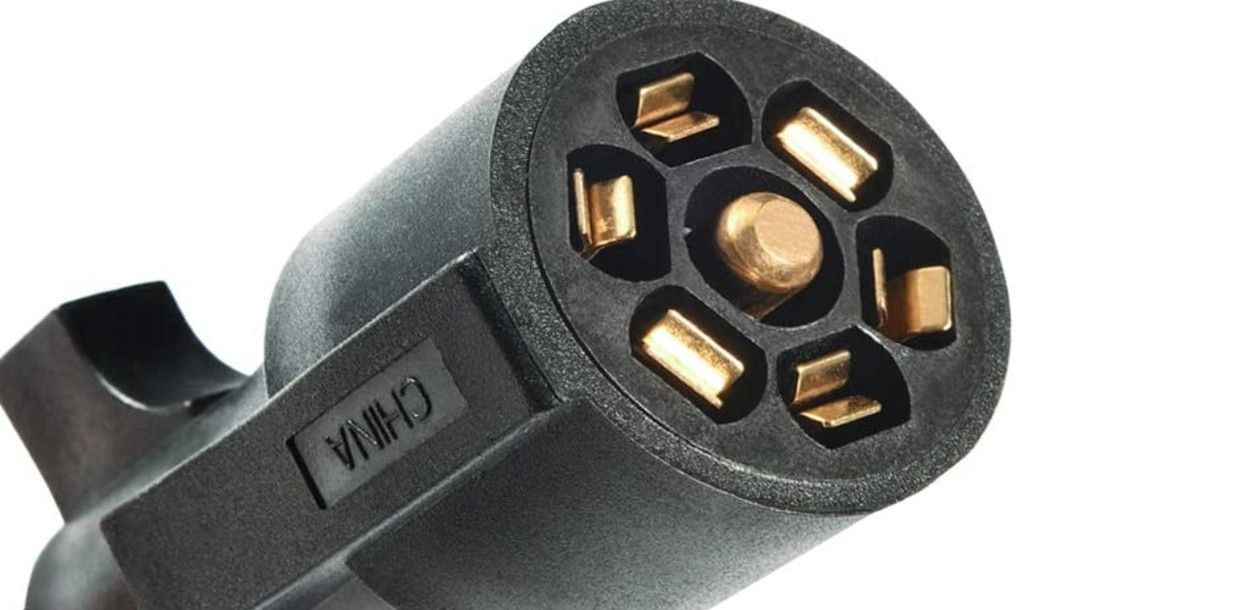
A 4-pin to 7-pin adapter maps the four core trailer wires (white=ground, yellow=left turn/brake, green=right turn/brake, brown=tail) into the matching pins on a 7-way RV-blade plug, leaving the brake (blue), battery charge (red), and aux (black) pins open unless needed. For trailers with electric brakes, add the blue wire to pin 5. Adapters cost $8-$20 and require no wiring.
If you need to wire or replace a 7-pin trailer connector — or adapt a 4-pin trailer to a 7-pin vehicle — this guide has you covered. You'll find pin-by-pin diagrams, brake and battery wiring steps, and a complete 4-to-7 adapter guide for mixed setups.
Heads up: some of the tool links below are affiliate links. As an Amazon Associate, BigLoads earns from qualifying purchases at no extra cost to you.
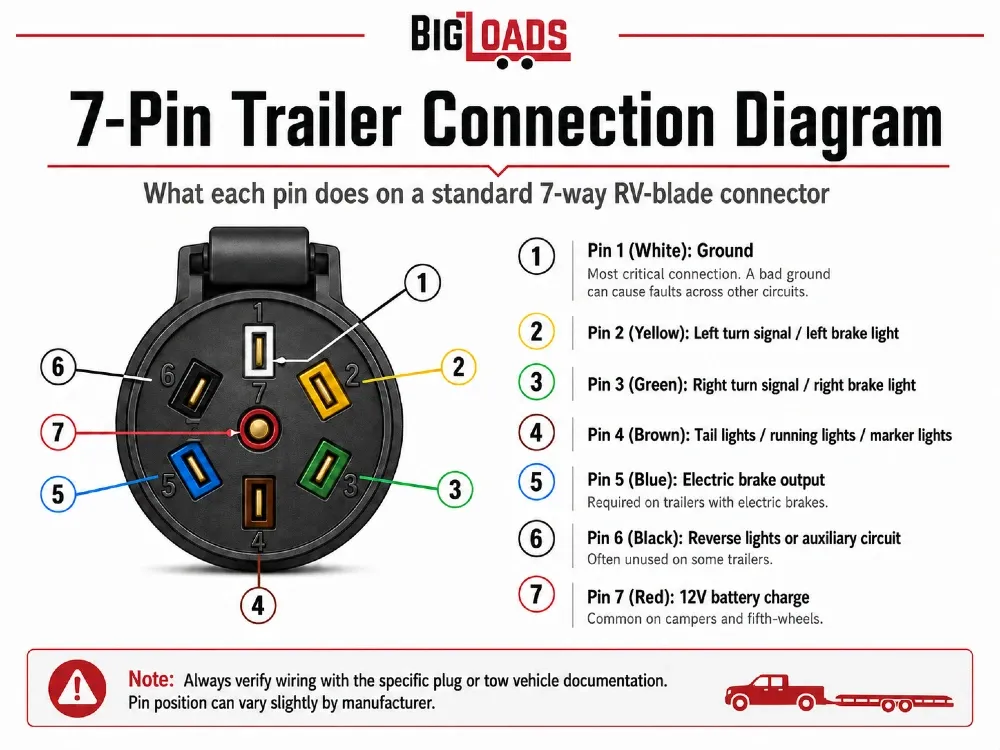
Save this diagram for quick reference, then keep scrolling for exactly what each wire color does, how to handle brake and battery wiring, and how to use a 4-pin to 7-pin adapter when your trailer only has four wires.
7-Pin Trailer Connection Diagram: What Each Pin Does
Before you touch a wire, understand what you're connecting. A standard 7-way RV-blade connector assigns each pin a specific function. This layout is shared across nearly all US-market trailers and tow vehicles:
- Pin 1 (White): Ground — the most critical connection. A bad ground causes ghost faults on all other circuits.
- Pin 2 (Yellow): Left turn signal and brake light.
- Pin 3 (Green): Right turn signal and brake light.
- Pin 4 (Brown): Tail lights and running lights.
- Pin 5 (Blue): Electric brake controller output — powers brake magnets.
- Pin 6 (Black): Reverse lights or auxiliary power (varies by vehicle).
- Pin 7 (Red): 12V battery charge — keeps a trailer battery topped up.
Always cross-check with the diagram that came with your specific plug or vehicle. Pin position can vary between round 7-way and flat 7-way connectors, though wire color assignments usually stay the same.
4-Pin to 7-Pin Trailer Adapter: Wiring Diagram and How It Works
Many older trailers only have 4 wires: ground (white), left brake/turn (yellow), right brake/turn (green), and tail/running (brown). When you tow one with a modern truck or SUV that has a 7-pin receptacle, you need a 4-pin to 7-pin adapter.
The adapter maps the 4 existing wires into the correct pins on the 7-way plug. The 3 unused pins (blue electric brake, red battery charge, and black reverse/aux) are left unconnected — which is fine if your trailer has no brakes and no on-board battery.
4-to-7 Adapter Wiring Diagram: Pin-by-Pin Mapping
- White (Ground): 4-pin pin 1 → 7-pin pin 1. Same position in both connectors on most plugs.
- Yellow (Left Turn/Brake): 4-pin pin 2 → 7-pin pin 2. No change.
- Green (Right Turn/Brake): 4-pin pin 3 → 7-pin pin 3. No change.
- Brown (Tail/Running): 4-pin pin 4 → 7-pin pin 4. No change.
- Blue, Red, Black (unused): Left open. If you later add electric brakes, wire blue into pin 5.
Plug-and-play adapters cost $8-$20 at most auto parts stores and are the easiest solution. They require no wiring — just plug the 4-pin flat trailer connector into one end and the 7-pin vehicle receptacle into the other.
- Use a molded rubber adapter for a permanent setup — it handles weather better than open-ended adapters.
- If your trailer lights flicker with an adapter, check the ground first. A 4-pin ground pin that doesn't seat fully into the 7-way socket is the most common cause.
- Utility and motorcycle trailers that only need lights are perfect 4-to-7 adapter candidates — no brakes, no battery, just the four core signals.
If you need a trailer with a fully wired 7-pin connector ready to go,
browse trailers for rent near you on BigLoads
1. Gather Your Tools and Materials
Before starting, make sure you have the following items:
- A 7-pin RV-blade trailer plug (the standard connector for most US tow vehicles)
- Wire strippers (a self-adjusting pair makes clean work of the small-gauge trailer wire)
- A 7-way circuit tester or multimeter to confirm every pin before you drive
- Heat shrink tubing or electrical tape
- A screwdriver
- Dielectric grease (optional but recommended to keep the pins from corroding)
2. Prepare and Strip the Wires
Strip about 1/2 inch of insulation off each wire end. Twist the strands together so no copper is loose. Loose strands inside the connector body cause shorts and intermittent faults that are hard to diagnose later.
3. Connect the Wires to the Pins
Follow these steps to wire the connector to your trailer:
- Start with the white ground wire first — a solid ground is the foundation of the whole system.
- Connect yellow (left turn/brake) and green (right turn/brake) next.
- Add brown (tail lights) and test all four basic circuits before proceeding.
- If your trailer has electric brakes, add the blue wire to the brake output pin.
- If your trailer has an on-board battery, add the red wire to the charge pin.
4. Wiring Trailer Brakes (Blue Wire)
The blue wire powers your electric brake controller. When you press the tow vehicle's brake pedal, the controller sends a proportional signal through the blue wire to the trailer's brake magnets. Without it properly connected:
- Your brake controller will show a "no trailer" fault.
- The trailer brakes will not engage at all — a serious safety issue on loaded trailers.
- State law in most states requires functional trailer brakes on trailers over a certain weight (commonly 3,000 lbs gross).
If you do not have a factory brake controller port on your tow vehicle, you'll need to add a plug-in or hardwired brake controller before the blue wire does anything.
5. Adding Battery Charge (Red Wire)
The red wire runs a 12V feed from your tow vehicle's battery to a trailer battery. It charges the trailer battery while driving. Key rules:
- Fuse the red wire at the tow vehicle — 20-30A is typical.
- If your trailer has no battery, you can leave the red wire disconnected.
- Running a slide-in camper or refrigerator off the trailer battery? The red charge wire keeps it powered on long hauls.
6. Secure and Test Your Connections
After connecting all wires, cover each terminal with heat shrink tubing or electrical tape. Apply dielectric grease inside the connector body before closing it. Then test every circuit:
- Plug the connector to a running tow vehicle.
- Turn on running lights — tail lights and marker lights should light up.
- Activate the left and right turn signals separately. Verify they match the trailer lights.
- Press the brake pedal and verify both trailer brake lights activate.
- If equipped with electric brakes, confirm your brake controller shows a trailer signal.
7. Install and Mount the Connector
Once all tests pass, route the connector wire along the trailer frame and secure it with zip ties. Leave enough slack near the coupler so the cord doesn't pull tight during sharp turns. A strain relief clamp at the connector body prevents the wire from working loose over time.
Need a Trailer Without the Wiring Hassle?
Wiring your own plug is the right call when you already own the trailer. But if you need a trailer for a single job, renting is usually cheaper and faster than wiring up a connector you'll use once.
Find a trailer to rent near you on BigLoads
You'll find dump, flatbed, enclosed, motorcycle, and utility trailers listed by owners across the US. No deposits, no dealership, just rent from a real person nearby.
Already own a trailer? List it on BigLoads and earn money renting it to people who need it nearby.
If you're unsure about trailer towing rules in your state — brake requirements, weight limits, and lighting laws — our
state trailer rental and towing laws hub
covers requirements for all 50 states. Also see our related guide:
how dump trailer rentals work and what they cost
Related on BigLoads: trailer lights & wiring in The Workshop · trailer hitch pin importance.
Frequently Asked Questions
What is the standard 7-pin trailer connection diagram?
How do I wire a 4-pin to 7-pin trailer adapter?
What does the blue wire do on a 7-pin trailer plug?
How do I wire a 7-pin trailer plug with brakes and a battery?
Can I use a 7-pin plug with a 4-pin trailer?
What happens if I wire the trailer connector wrong?
Ready to haul?
Find the right trailer near you — or list yours and start earning.